
If you read my blog yesterday I posted an article about creating a virtual museum using 123D Catch and Google Sketchup Pro. Apart from the large scale project, this has also given me a chance to play around more with these programs, and especially with Sketchup. As a result I’ve learnt a few more skills I’d like to share with you.
Sketchup is a brilliant program, and in my opinion the easiest and most efficient 3D modelling software for archaeology. For other uses it could be a but simplistic, especially when realism is an issue, but for creating models of sites or structures for display it is sufficiently capable. I currently have Sketchup Pro, as well as V-Ray for rendering images, but there is a free version of Sketchup that has most of the functions of the Pro version and that is sufficient for most models. The tips in this article though are based on the Pro-Vray combination, although some of them should still be available in the free version.
Materials: One of the things I was trying to achieve in the museum was creating little tags for objects, in which I could display information. Because I didn’t really need to write the actual text, to see if it would work I got an image of text from the internet and then loaded in the paint tool. I’d done this before, but I was having trouble making the text fit perfectly. After trying different approaches I noted there was a “position” material tool when I right clicked the surface. This opened up a nice interface which allowed me to successfully position the image. Saved me a lot of time, and it has good potential for other things too. One of the ideas I was thinking was to create a large circular wall around a site onto which I could paint a landscape, so when it was rendered it gave the impression of being place in the real world. The positioning tool would allow me to manipulate this texture in order to make it continuous, without having to play around with the scale.

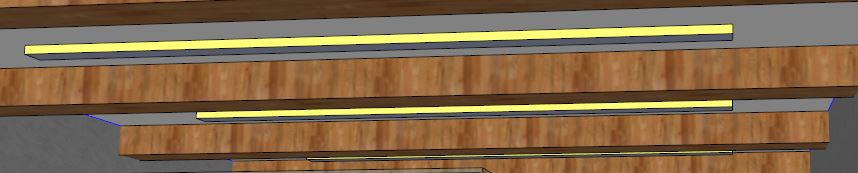
Lighting: I finally used the lighting tool with V-Ray, which was harder to understand than I thought, This was the first time I created an entirely internal space, and lighting was an issue. By creating a long thin rectangle, and placing the light on one side I created a convincing neon light. The trick here was increasing the intensity to 150, rather than the measly 30 it is at, which makes it seem like it is not working. I am also honestly impressed with this tool, it does add a lot to the realism, and I’m even thinking of adding a few lights under objects to give them a lit up effect.
Walk tool: I usually pan and zoom and use the orbit tool when I’m editing and when I’m showing people my work, but the walk tool is a much nicer way to present a model. It allows the user to feel like they are present on the site rather than an external viewer, and it’s much less shaky than I thought, You can even make it so that it will automatically stop when you encounter a surface which is great, considering on occasion this is an issue with the orbit, pan and zoom tools.
Obj importing: Didn’t realise that Sketchup could import object files, which is great. Many 3d programs have difficulty with the material files associated with the 123D Catch obj files, yet Sketchup seems to have none. It is hard to alter the files themselves, yet it’s a good way to put them in context. A feature could be placed within the reconstructed model of the site, and if all of the features were recorded they could be glued together to make the entire site.

Glass: I made a few glass cabinets for the virtual museum and then tried making them transparent. I painted them light blue and then set the opacity to 18, making them only slightly visible. When rendering the images, this created a big problem, as for some reason the outer side of the glass was transparent, while the inner was reflective, creating an odd mirror effect. I had to Google this one, and the solution seems to be to give the surface at least a bit of thickness. By creating a 3D pane of glass, rather than just a 2D surface of glass the problem is solved, with realistic effects

Some of these tips are probably obvious, however being self taught in the program means that I have gaps in some areas. However the good thing of Sketchup is it requires little knowledge, just a keen interest.
